Site
Default Site is not allow to delete.
Forget Device or Move Device to another Site
1. Click Device > Select AP > Configuration > Manage Device
2. Click Forget or "Move this device to" then select the new site
2017年3月22日 星期三

2017年2月17日 星期五
UniFi Controller Run as Windows Services and UniFi Cloud Access got Error : An error occurred. Cloud access is not compatible with this OS architecture
This page is slowing how to let UniFi Controller run as Windows Services and it also can fix can't enable the Cloud function.
Link
UniFi Account Page : https://account.ubnt.com
UniFi Cloud Access Page : https://unifi.ubnt.com/#/

Enabled UniFi got problem and get "An error occurred. Cloud access is not compatible with this OS architecture."
Step 1 :
- Make sure you already create account on UniFi
Step 2 :
- You need install update both x86 & x64 Java
Step 3 :
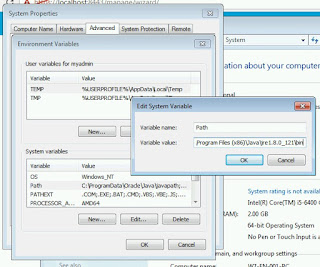
- add "C:\Program Files (x86)\Java\jre1.8.0_121\bin" to Path on "Environment Variables..."
Step 4 :
Remark :
After run as services, you don't need to open UniFi shortut ("%username%\Ubiquiti UniFi\lib\ace.jar" ui), if you double click open the UniFi Controller Windows, please click "Hide", if you close this windows and click yes to confirm close the UniFi Controller, the services will close and you would not get the connection on Browser.
Link
UniFi Account Page : https://account.ubnt.com
UniFi Cloud Access Page : https://unifi.ubnt.com/#/
Enabled UniFi got problem and get "An error occurred. Cloud access is not compatible with this OS architecture."
Step 1 :
- Make sure you already create account on UniFi
Step 2 :
- You need install update both x86 & x64 Java
Step 3 :
- add "C:\Program Files (x86)\Java\jre1.8.0_121\bin" to Path on "Environment Variables..."

Step 4 :
- Close any instances of the UniFi software on the controller
- Open the command prompt as an Administrator
- Run Command Prompt as an Administrator, then change directory to the location of UniFi in your computer, using the command:
cd "%UserProfile%\Ubiquiti UniFi\" - Once in the root of the UniFi folder, issue the following:
java ‐jar lib\ace.jar installsvc
Step 5 :
- Restart a computer, now you can access https://localhost:8443 without turn on the UniFi Controller
- Restart a computer, now you can access https://localhost:8443 without turn on the UniFi Controller
Remark :
After run as services, you don't need to open UniFi shortut ("%username%\Ubiquiti UniFi\lib\ace.jar" ui), if you double click open the UniFi Controller Windows, please click "Hide", if you close this windows and click yes to confirm close the UniFi Controller, the services will close and you would not get the connection on Browser.
2016年4月11日 星期一
How to solve the slow Wi-Fi problem 如何解決 Wi-Fi 慢的問題
時下購買 Wi-Fi Router 請購買有 5Ghz Wireless Router, 只有2.4Ghz的Wireless Router其實很不在很不適合香港地方使用。
5Ghz Wi-Fi 信號的最大好處,速度比2.4Ghz快,但穿透力極差所以會怕坐房的同事接收唔到
2.4GHz Wi-Fi 信號的最大好處係穿透力高,但速度比5Ghz慢,但致命點係受干擾
當你使用手機搜尋無線時你會發現很多無線Router,基本上所有2.4Ghz 頻道內的頻譜很小,當Wi-Fi router接收到信號只會回應正確密碼的設備,不正確密碼的需不作回應但接收到信號時已使用了其頻寬,你不能想像佢絕大部份都唔係幫你做緊野,係不停咁收到信號又要reject, 所以會出現慢的情況,當你覺得隻Wi-Fi慢時,往往會考慮換隻接收勁D既Wi-Fi, 結果係你受干擾既距離更加大,死既人就越來越多,下圖係我屋企既Wi-Fi 2.4GHz (MYS)及5Ghz (MYS 5Ghz), 你可以睇到 2.4Ghz 得13條Channel, MYS係Channel 1但係其實cover到去Channel 3底層既Wi-Fi互相重疊到連名都睇唔到! 我係屋企用2.4Ghz Wi-Fi 基本上係慢到用唔到,有時download ok 50MB, upload 得0.1MB,而5Ghz Channel 基本上因為穿透力低根本收唔到隔離屋既信號所以速度及穏定性都很高!

早前購買左Apple Airport Extreme, 可以單一SSID同時接收2.4Ghz及5Ghz頻道,使用了一個多月,實在很不理常,行雙頻道本來係好好既設計,但有時係真係唔知你們的手機會接左去2.4Ghz定5Ghz, 假如去左2.4Ghz可能就會很慢, 因為係受干擾速度慢,而唔係接收唔到,所以佢唔會調返去5Ghz,因為無法控制所以我建議拆返開兩個SSID用一定會比單SSID雙頻好!
AirPort Utility > Wireless > Wireless Options > Enable 5Ghz 就可以分開不同SSID不同頻道,咁唔一定個個人都要咁做,好似上圖咁你唔拆開一定唔掂,但如果你住半山密度低基本上都唔洗點怕受太多干擾就梗係單SSID雙Channel啦。

5Ghz Wi-Fi 信號的最大好處,速度比2.4Ghz快,但穿透力極差所以會怕坐房的同事接收唔到
2.4GHz Wi-Fi 信號的最大好處係穿透力高,但速度比5Ghz慢,但致命點係受干擾
當你使用手機搜尋無線時你會發現很多無線Router,基本上所有2.4Ghz 頻道內的頻譜很小,當Wi-Fi router接收到信號只會回應正確密碼的設備,不正確密碼的需不作回應但接收到信號時已使用了其頻寬,你不能想像佢絕大部份都唔係幫你做緊野,係不停咁收到信號又要reject, 所以會出現慢的情況,當你覺得隻Wi-Fi慢時,往往會考慮換隻接收勁D既Wi-Fi, 結果係你受干擾既距離更加大,死既人就越來越多,下圖係我屋企既Wi-Fi 2.4GHz (MYS)及5Ghz (MYS 5Ghz), 你可以睇到 2.4Ghz 得13條Channel, MYS係Channel 1但係其實cover到去Channel 3底層既Wi-Fi互相重疊到連名都睇唔到! 我係屋企用2.4Ghz Wi-Fi 基本上係慢到用唔到,有時download ok 50MB, upload 得0.1MB,而5Ghz Channel 基本上因為穿透力低根本收唔到隔離屋既信號所以速度及穏定性都很高!

早前購買左Apple Airport Extreme, 可以單一SSID同時接收2.4Ghz及5Ghz頻道,使用了一個多月,實在很不理常,行雙頻道本來係好好既設計,但有時係真係唔知你們的手機會接左去2.4Ghz定5Ghz, 假如去左2.4Ghz可能就會很慢, 因為係受干擾速度慢,而唔係接收唔到,所以佢唔會調返去5Ghz,因為無法控制所以我建議拆返開兩個SSID用一定會比單SSID雙頻好!
AirPort Utility > Wireless > Wireless Options > Enable 5Ghz 就可以分開不同SSID不同頻道,咁唔一定個個人都要咁做,好似上圖咁你唔拆開一定唔掂,但如果你住半山密度低基本上都唔洗點怕受太多干擾就梗係單SSID雙Channel啦。
2015年7月9日 星期四
Sonicwall [Guest authentication / Captive Portal] Configuration Flow & Guide
Sonicwall Guess services allow you to force wire & wireless connection to accept terms or login for internet access
1. First you should setup interface port for the connection (for example we using X4 port)
2. configure the DHCP for X4 interface
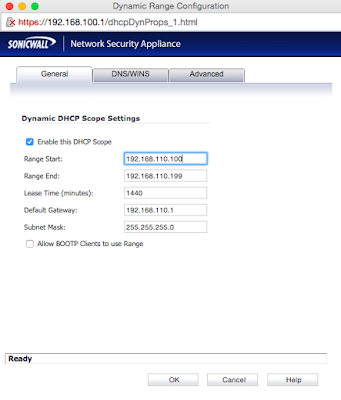
3. Create a new zone assign to X4 interface
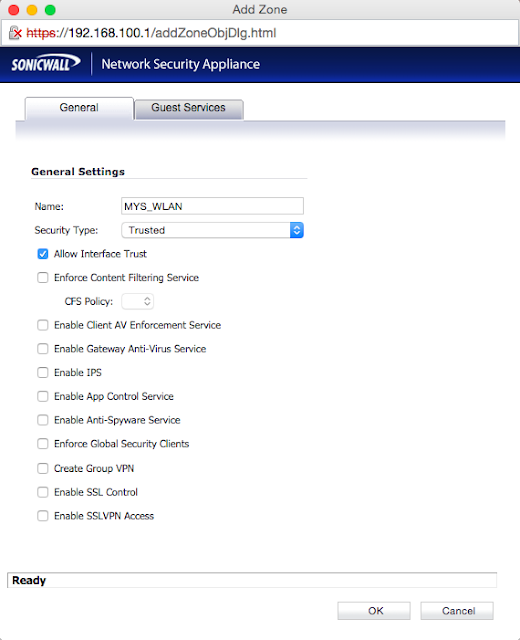
4. Enable the Guest services.
remark : if you just want client to accept terms with out authentication, you can click "Enable Policy Page without authentication", configure button you can modify the terms detail.
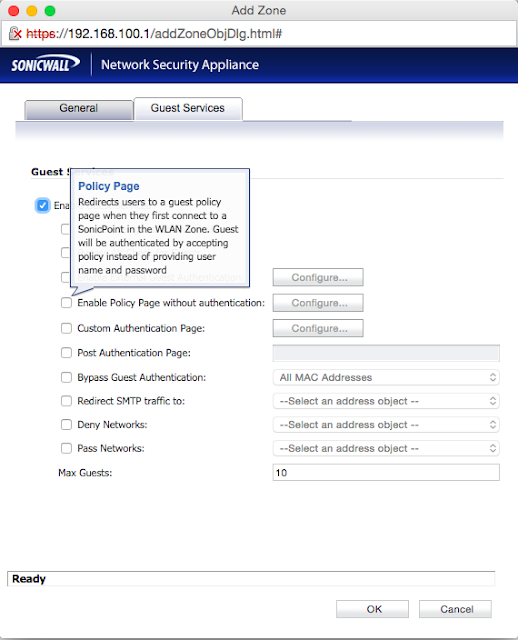
5. Configure the Guest Services.
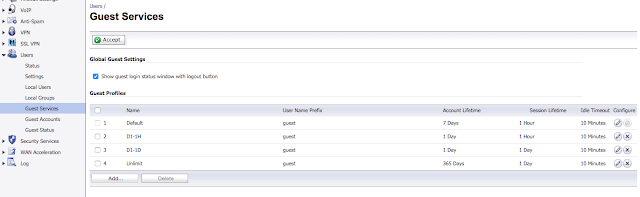
6. Base on services you can mass generate account and print the ticket.
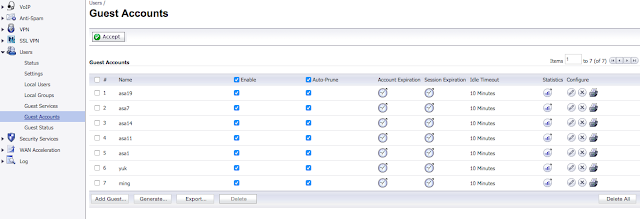
7. Guest status you will see all connected session.
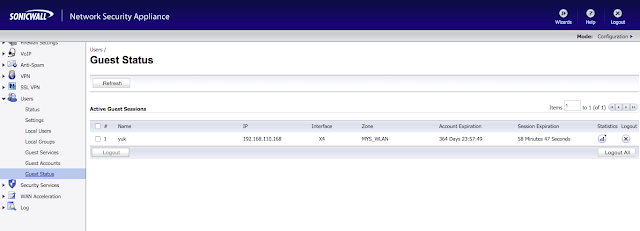
8. After connect the Wire / Wireless, open the browse you will get the login page.
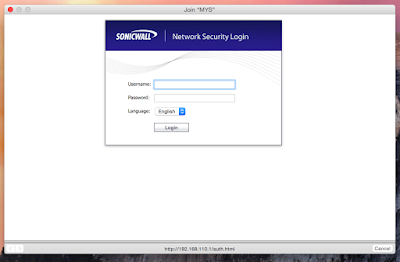


1. First you should setup interface port for the connection (for example we using X4 port)
2. configure the DHCP for X4 interface

3. Create a new zone assign to X4 interface

4. Enable the Guest services.
remark : if you just want client to accept terms with out authentication, you can click "Enable Policy Page without authentication", configure button you can modify the terms detail.

5. Configure the Guest Services.

6. Base on services you can mass generate account and print the ticket.

7. Guest status you will see all connected session.

8. After connect the Wire / Wireless, open the browse you will get the login page.

9. If you enable no authentication will direct show terms, once the wireless is off, the session will remove around 15-30mins

Remark :
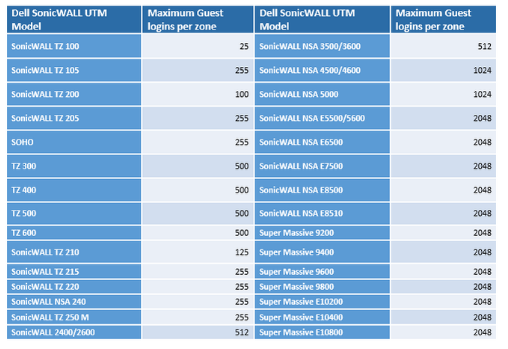
You should check your Sonicwall maximum connection for guest.
2015年6月15日 星期一
Wireless Spec
Wireless 規格分為 IEEE 802.11 a/b/g/n 及 ac ,主要分別都是速度。
Wi-Fi使用的radio frequency頻段為2.4GHz或者5GHz,簡單整理成下表:
資料來自http://bryceknowhow.blogspot.hk/2013/11/wi-fi-ieee-80211-abgnac.html
Wi-Fi使用的radio frequency頻段為2.4GHz或者5GHz,簡單整理成下表:
Protocol
|
Frequency
|
Max PHY Rate
|
Inside
|
Outside
|
Legacy
|
2.4-2.5GHz
|
2Mbps
|
-
|
-
|
802.11a
|
5.15-5.35GHz
5.47-5.725GHz
5.725-5.875GHz
|
54Mbps
|
30m
|
45m
|
802.11b
|
2.4-2.5GHz
|
11Mbps
|
30m
|
100m
|
802.11g
|
2.4-2.5GHz
|
54Mbps
|
30m
|
100m
|
802.11n
|
2.4 / 5GHz
|
150Mbps(40MHz * 1MIMO)
600Mbps(40MHz * 4MIMO)
|
70m
|
250m
|
802.11ac
|
5GHz
|
200Mbps(40MHz * 1MIMO)
433.3Mbps(80MHz * 1MIMO)
866.7Mbps(160MHz * 1MIMO)
|
35m
|
以下將細談 802.11n 的設定及選擇...
- IEEE802.11n 是支援2.4Ghz及5Ghz 頻道而 802.11ac 只支援5Ghz頻道
- Wireless N 有 MIMO功能,2.4Ghz可使每支天線達到150Mbps的傳輸速度,簡單來講,雙天線可以有300Mpbs速度,3天線有450Mpbs速度,而5Ghz可使每支天線達到300Mbps的傳輸速度,雙天線就有600Mpbs速度。***
- 2.4Ghz與5Ghz的優點缺點是2.4Ghz有長遠的距離,而5Ghz則有大的頻寛速度較快,但5Ghz的穿透力很弱。
- 在2.4Ghz即使有3天線450Mpbs速度由於香港密度太高四圍都是Router,2.4Ghz Wi-Fi Router重疊基本上行到穏定的40-50Mbps已經十分難得。最好使用DualBand 5Ghz或AC 5Ghz頻道,最小應該都可以達致100Mbps傳輸速度。
*** 注意這是頻寛速度,假如你的Router有4天線600Mpbs速度,家裹有10個設備使用Wi-Fi,600Mpbs是這十個設備的總頻寛,而並不是每個設備均可以同一時間有600Mpbs上下載速度。
N Data Rate Speed, 有些Router可以選擇MCS速度,一般為Auto。
| MCS index | Spatial streams | Modulation type | Coding rate | Data rate (Mbit/s) | |||
|---|---|---|---|---|---|---|---|
| 20 MHz channel | 40 MHz channel | ||||||
| 800 ns GI | 400 ns GI | 800 ns GI | 400 ns GI | ||||
| 0 | 1 | BPSK | 1/2 | 6.5 | 7.2 | 13.5 | 15 |
| 1 | 1 | QPSK | 1/2 | 13 | 14.4 | 27 | 30 |
| 2 | 1 | QPSK | 3/4 | 19.5 | 21.7 | 40.5 | 45 |
| 3 | 1 | 16-QAM | 1/2 | 26 | 28.9 | 54 | 60 |
| 4 | 1 | 16-QAM | 3/4 | 39 | 43.3 | 81 | 90 |
| 5 | 1 | 64-QAM | 2/3 | 52 | 57.8 | 108 | 120 |
| 6 | 1 | 64-QAM | 3/4 | 58.5 | 65 | 121.5 | 135 |
| 7 | 1 | 64-QAM | 5/6 | 65 | 72.2 | 135 | 150 |
| 8 | 2 | BPSK | 1/2 | 13 | 14.4 | 27 | 30 |
| 9 | 2 | QPSK | 1/2 | 26 | 28.9 | 54 | 60 |
| 10 | 2 | QPSK | 3/4 | 39 | 43.3 | 81 | 90 |
| 11 | 2 | 16-QAM | 1/2 | 52 | 57.8 | 108 | 120 |
| 12 | 2 | 16-QAM | 3/4 | 78 | 86.7 | 162 | 180 |
| 13 | 2 | 64-QAM | 2/3 | 104 | 115.6 | 216 | 240 |
| 14 | 2 | 64-QAM | 3/4 | 117 | 130 | 243 | 270 |
| 15 | 2 | 64-QAM | 5/6 | 130 | 144.4 | 270 | 300 |
| 16 | 3 | BPSK | 1/2 | 19.5 | 21.7 | 40.5 | 45 |
| 17 | 3 | QPSK | 1/2 | 39 | 43.3 | 81 | 90 |
| 18 | 3 | QPSK | 3/4 | 58.5 | 65 | 121.5 | 135 |
| 19 | 3 | 16-QAM | 1/2 | 78 | 86.7 | 162 | 180 |
| 20 | 3 | 16-QAM | 3/4 | 117 | 130 | 243 | 270 |
| 21 | 3 | 64-QAM | 2/3 | 156 | 173.3 | 324 | 360 |
| 22 | 3 | 64-QAM | 3/4 | 175.5 | 195 | 364.5 | 405 |
| 23 | 3 | 64-QAM | 5/6 | 195 | 216.7 | 405 | 450 |
| 24 | 4 | BPSK | 1/2 | 26 | 28.8 | 54 | 60 |
| 25 | 4 | QPSK | 1/2 | 52 | 57.6 | 108 | 120 |
| 26 | 4 | QPSK | 3/4 | 78 | 86.8 | 162 | 180 |
| 27 | 4 | 16-QAM | 1/2 | 104 | 115.6 | 216 | 240 |
| 28 | 4 | 16-QAM | 3/4 | 156 | 173.2 | 324 | 360 |
| 29 | 4 | 64-QAM | 2/3 | 208 | 231.2 | 432 | 480 |
| 30 | 4 | 64-QAM | 3/4 | 234 | 260 | 486 | 540 |
| 31 | 4 | 64-QAM | 5/6 | 260 | 288.8 | 540 | 600 |
| 32 | 1 | BPSK | 1/2 | N/A | N/A | 6.0 | 6.7 |
asd
2015年3月4日 星期三
TP-Link WPA271KIT HomePlug Information


Create a Powerline network using the Pair button
You can connect a number of devices on a powerline network, but you can use the Pair button on only two devices at a time.
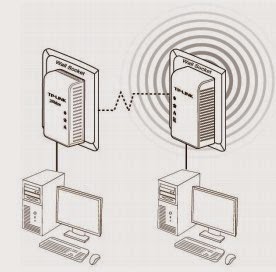 Step 1. Press and hold the Pair button of Powerline device A TL-PA211 for 3 to 8 seconds, the Power
LED will start flashing.
Step 1. Press and hold the Pair button of Powerline device A TL-PA211 for 3 to 8 seconds, the Power
LED will start flashing.Step 2. Press and hold the Pair button of Powerline device B TL-WPA281 for 1 second, the Power LED will start flashing. (This must be done within 120 seconds after pressing the Pair button of Powerline device A.)
Step 3. Wait for about 60 seconds while your Powerline device A and B are connecting. The Power LED on both devices will stop flashing and become solid light when the connection is made.
Join an existing Powerline Network:
Powerline device A and Powerline device B form a HomeplugAV Network, and Powerline device C wants to join this network.
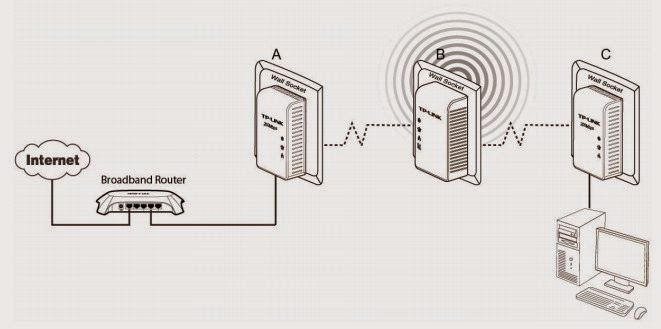
Step 1. Press and hold the Pair button on Powerline device C TL-PA211 for 3 to 8 seconds.
Step 2. Press and hold the Pair button on Powerline device A/B for 1 second/3 to 8 seconds. (This step must be taken within 120 seconds after step 1 is finished.)
Step 3. Wait for about 60 seconds while your Powerline devices are connecting. The Power LED on Powerline device A/B and C will stop flashing and become solid light when the connection is made.
Leave an existing Powerline Network:
As the figure above shows, Powerline device A, B and C have formed a HomeplugAV Network. The user wants to remove one device (Powerline adapter C) from this network.
Step 1. Press and hold the Pair button on Powerline device C for at least 10 seconds. Powerline device C will reset and restart.
Step 2. Wait for the reset to complete.
Reset
To reset the Powerline device:
Press and hold the Reset button for about 10 seconds, and then release the button. You will see all LEDs begin to flash. At this moment, the default settings have been restored. Be careful, don’t power off when the device is in reset process.
2014年3月7日 星期五
Wireless Connection for Windows
Lenovo ThinkVantage Access Connection
1. Lenovo Notebook一般會以自家軟件控制Wireless Connection而非使用Windows的Zero Configuration, 在右下角找到 ThinkVantage Access Connection Icon, double click it

2. Click 尋找WLAN

3. Double Click 你需要連接到的 Wi-Fi, 如無法找到, 可以按一下 Find Again

4. Double Click後需輸入Password

5. 等待驗証及取得IP Address

6. 成功連線後可以儲存設定你亦可以按取消不儲存設定及密碼

Windows 7
How to connect the Wi-Fi Network
1. Click "Network Connection Icon" on right coner
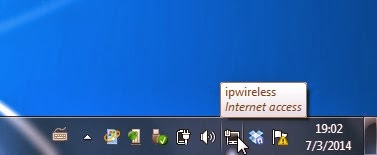
2. Click your Wi-Fi SSID and click "Connect"
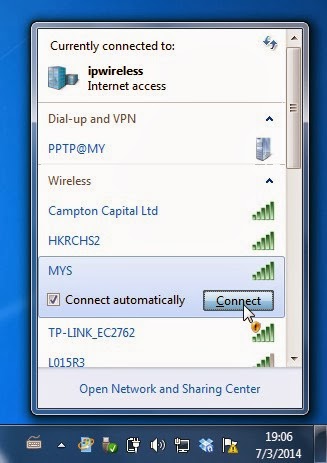
3. Enter the Wi-Fi Password

How to forgot the previous Wi-Fi Connection


Windows 8.1
How to connect the Wi-Fi Network
1. Click "Network Connection" on right coner


How to forgot the previous Wi-Fi connection and reconnect it
1. You can't forgot the previous Wi-Fi connection
2. If your previous Wi-Fi connection got the problem to connect it will show the below picture.

3. Just click and connect it, then you need enter the password again, it will update the security type.
Apple Mac OS X v10.6.8
Simple just click icon > choice your wifi SSID and enter password


1. Lenovo Notebook一般會以自家軟件控制Wireless Connection而非使用Windows的Zero Configuration, 在右下角找到 ThinkVantage Access Connection Icon, double click it
2. Click 尋找WLAN
3. Double Click 你需要連接到的 Wi-Fi, 如無法找到, 可以按一下 Find Again
4. Double Click後需輸入Password
5. 等待驗証及取得IP Address
6. 成功連線後可以儲存設定你亦可以按取消不儲存設定及密碼
Windows 7
How to connect the Wi-Fi Network
1. Click "Network Connection Icon" on right coner
2. Click your Wi-Fi SSID and click "Connect"
3. Enter the Wi-Fi Password
How to forgot the previous Wi-Fi Connection
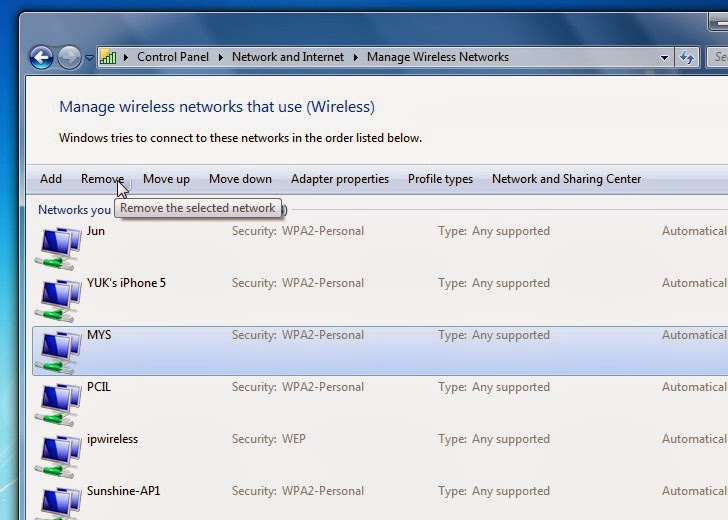
- Once you connect the Wi-Fi, it will store the setting on Windows, when you change the Wi-Fi security setting or Hardware equipment but still using the same SSID (e.g. MYS), it will never connect the Wi-Fi again and it will become the following screen.
1. Click the "Network Connection" icon on right coner
2. Click "Open Network and Sharing Center"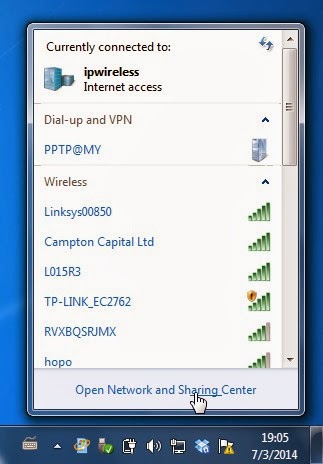
3. Click "Manage Wireless Networks"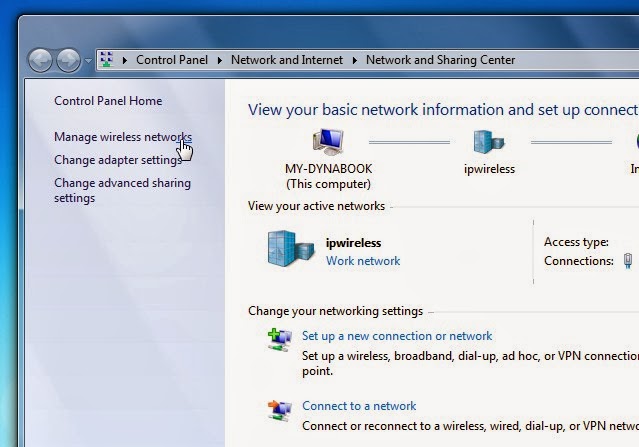 4. Click the store setting (e.g. MYS) and click "Remove", it will back to Normal and you can connect it again.
2. Click "Open Network and Sharing Center"
3. Click "Manage Wireless Networks"
4. Click the store setting (e.g. MYS) and click "Remove", it will back to Normal and you can connect it again.Windows 8.1
How to connect the Wi-Fi Network
1. Click "Network Connection" on right coner
2. Choose your WiFi SSID, click "Connect" and enter your Wi-Fi Password
How to forgot the previous Wi-Fi connection and reconnect it
1. You can't forgot the previous Wi-Fi connection
2. If your previous Wi-Fi connection got the problem to connect it will show the below picture.
3. Just click and connect it, then you need enter the password again, it will update the security type.
Apple Mac OS X v10.6.8
Simple just click icon > choice your wifi SSID and enter password
How to forgot the connection setting, click "Open Network Preferences"
Click Airport and Advanced
Click SSID and click Remove
訂閱:
文章 (Atom)