顯示具有 Office 365 標籤的文章。 顯示所有文章

2017年9月6日 星期三

Change Exchange Online Inbox Language


Login to Webmail, Click "Options" > "Mail"


 Left Panel select "Region and Time Zone" and change your language


After change the language, you will show "Rename default folders so their names match the specified language", after click SAVE the inbox language will changed, if you using Outlook 2016, it will change too

2017年4月17日 星期一

Office 365 Request Partners Relationship

Partner Step

1. Click "Partner Center"

2. Click "Customers" > "Request a relationship"


3. Enter you partners code


4. Copy the email text and sent to client

Client Step
1. After receive the relational request, client the link and sign in your admin account


2. Authorize the relationship, done.


2017年3月27日 星期一

Wharf bMail / IBM Collabserv Business Mail migrate to Office 365 (Full / Partial Migrate)

IBM bMail to Office 365 Migration (Patial Migrate)

1. Get Microsoft Office 365 ready

2. Add domain in Office 365, add DNS TXT record to verify domain (e.g. : MS=ms39095089)

3. Office 365 prepare all e-mail account
 - Get ready all user mailbox (please using @xxx.onmicrosoft.com first)
 - Get ready all distribution list is correct  (please using @xxx.onmicrosoft.com first)
 - Get ready all forward and alise is correct  (please using @xxx.onmicrosoft.com first)

4. Office 365 > Setup > Data Migration > Setup sync mailbox from IBM bMail

5. About Data Migration should waiting all Status is Synced

6. Office 365 > Exchange Admin Center > Mail flow > accepted domains
 - Change "Authoritative" to "Internal Relay"

7. Optionally, unblock the existing email server
 - Exchange Admin Center > protection > connection filter > add IBM bMail IP

8. ADD DNS record (MX, SPF)
 - Office 365 MX Priority should greater than existing one
 For Example :
MX : mys-com-hk-mx.mail.na.collabserv.com (priority: 10)
MX : mys-com-hk-mx-bk.mail.na.collabserv.com (priority: 20)
MX : mys-com-hk.mail.protection.outlook.com (priority: 30)

*** If add SPF must include bMail and ISP, this is for prevent bMail can't sent out e-mail. ***
*** You can ignore SPF first, after all migration done, then add it back ***

9. Starting Migrate e-mail account from bMail to Office 365 (Patial migrate each account)
 For Example to migrate Wincy Mailbox
 - bMail Wincy Mailbox forward e-mail to Office 365 wincy.chu@mys.onmicrosoft.com
 - Data Migration should disable wincy.chu@mys.onmicrosoft.com
 - Office 365, Change wincy.chu@mys.onmicrosoft.com to wincy.chu@mys.com.hk
 - wincy.chu@mys.onmicrosoft.com should keep here for receiving forward mail
 - After 15 mins should be all worked!

10. After few day monitoring no problem on incoming e-mail, you can remove Wincy Chu e-mail account from bMail, just create Distribution list "wincy.chu@mys.com.hk" then forward to "wincy.chu@mys.onmicrosoft.com", you can reduce one mailbox slot.

11. bMail existing distribution list, you should created on Office 365 but not using @mys.com.hk, should using @mys.onmicrosoft.com, once all mailbox migrated, you can change to @mys.com.hk.

12. If all mailbox migrated and you don't need bMail, please remove all bMail DNS record and remove all setting on IBM server, also terminate it, after done please follow Step 6. change "Internal Relay" to "Authoritative"


Q&A :   Important (Partial Migrate) Please Read
Q: Why Office 365 Distribution list should using @mys.onmicrosoft.com not @mys.com.hk
A: Because the primary server on bMail, if you using @mys.com.hk on Distribution list, Wincy sent e-mail to Distribution list may not success route to bMail

Q: What is the flow between bMail & Office 365
A: All incoming mail to @mys.com.hk, according to DNS priority should delivery to bMail first, then forward to Office 365.
 - bMail to Office 365 is forward to @mys.onmicrosoft.com so should no problem
 - Office 365 back to bMail, if any mailbox or distribution list using @mys.com.hk for e-mail, the mail will internal route to mailbox, will not forward to bMail, so Distribution list should not created on Office 365 or just using @mys.onmicrosoft.com.

2016年7月26日 星期二

Office365 Powershell Disable Clutter

Enter the Powershell with administrator right

https://technet.microsoft.com/en-us/library/jj984289(v=exchg.160).aspx

Connect to Exchange Online

  1. On your local computer, open Windows PowerShell and run the following command.
    $UserCredential = Get-Credential
    
    In the Windows PowerShell Credential Request dialog box, type your Office 365 user name and password, and then click OK.
  2. Run the following command.
    $Session = New-PSSession -ConfigurationName Microsoft.Exchange -ConnectionUri https://outlook.office365.com/powershell-liveid/ -Credential $UserCredential -Authentication Basic -AllowRedirection
    
    Note   If you are an Office 365 operated by 21Vianet customer in China, use the following value for the ConnectionUri parameter:https://partner.outlook.cn/PowerShell.
  3. Run the following command.
    Import-PSSession $Session
    
noteNote:
Be sure to disconnect the remote PowerShell session when you're finished. If you close the Windows PowerShell window without disconnecting the session, you could use up all the remote PowerShell sessions available to you, and you'll need to wait for the sessions to expire. To disconnect the remote PowerShell session, run the following command.

To Enable or Disable Clutter for one user

To enable clutter for one user run:
PS C:\Scripts> Set-Clutter -Identity user@domain.com -Enable $true
To disable clutter for one user run:
PS C:\Scripts> Set-Clutter -Identity user@domain.com -Enable $false

To Enable or Disable Clutter for all users

To enable clutter for all users run:
PS C:\Scripts> Get-Mailbox | Set-Clutter -Enable $true
To disable clutter for all users run:
PS C:\Scripts> Get-Mailbox | Set-Clutter -Enable $false
Some users have reported that they do not have access to this cmdlet within Microsoft Office 365. Hopefully they will receive access to it shortly

2016年4月6日 星期三

Office 365 Exchange Online Setting

Office 365 Exchange Online Setting

Distribution Group E-Mail
 - coming

Grand permission to Staff A open Staff B mailbox
 - coming


Configure Exchange Mode for Outlook 2013/2016
Please refer the official link, watch a video
https://support.office.com/en-us/article/Set-up-email-in-Outlook-6e27792a-9267-4aa4-8bb6-c84ef146101b?ui=en-US&rs=en-US&ad=US


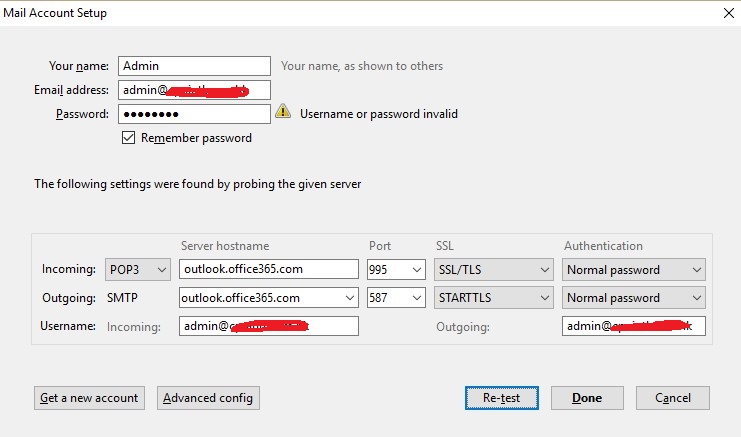
POP3, IMAP and SMTP setting
When you change E-mail services to Office365, remember you have a lot of equipment/application may not sent e-mail anymore because you need to update the smtp server name, port and username/password.


Will using SMTP equipment/application
e.g. Copier Scan to E-Mail, Server iLO/iMM/iDrac, Server/NAS/Hardware/Software application warning/error notification e-mail.


If you’re connecting to your Office 365 for business email, you don’t need to look up your settings. For Office 365 for business, use the following settings.

* Some clients refer to implicit TLS as SSL.

source from https://support.office.com/en-us/article/Outlook-settings-for-POP-and-IMAP-access-for-Office-365-for-business-or-Microsoft-Exchange-accounts-7fc677eb-2491-4cbc-8153-8e7113525f6c?ui=en-US&rs=en-US&ad=US

This is sample such as configure Office 365 Pop3/SMTP mode on Thunderbird or Non-support Exchange Mode mail client.


The following problem is i tried before.


Trial / Start Office 365 Exchange Online
Problem :
Always hang on, we're not quite ready when you access the mailbox

First time register the trial Office 365 for your domain, you should using xxxxxx.onmicrosoft.com to setup a mailbox first, once everything is done and you can access the mailbox on web, then you can set your domain as default and create another user account.
I tried if i quick start a trial and setup my company domain as default and i never try access the mailbox on web, Office 365 may be can't create a mailbox for your domain, so should using onmicrosoft.com first.

Always show we are preparing a mailbox for this user


Solution :
Try change xxxxx.onmicrosoft.com is your default domain, access the mailbox then change back your company domain to default.


Mailbox Database and delete the old mail.
Current each mailbox basic is 50GB mailbox, when you delete the mail and empty the deleted item folders, you can free up more space on your mailbox, but all of your deleted item you can recovery on 30 days, that mean even you empty the deleted item, you also can recovery with-in 30day, actually on background each user have 50GB storage for store deleted item.  So what's the problem?  If background 50GB storage for recovery deleted item is full and no space, all delete the e-mail and empty the folder it will show up again, just like can't delete the mail, this is cause by user delete e-mail over 50GB with-in 30 days, the only way is call Microsoft for temporary increase the background storage or wait few day for reduce the background storage.

Problem :
E-mail come up after delete.

Cause :
User delete e-mail over 50GB with-in 30 days

Solution :
call Microsoft for temporary increase the background storage or wait few day for reduce the background storage.

2015年7月2日 星期四

How to add / renew Office 365 by Volume License Paper


For new purchase and renew you have two options

1. Purchase Online (Pay by Credit Card for Month or Year)
2. Purchase Volume License (Purchase from Vendor / Partners)
   *** first time redeem code please click this link https://portal.office.com/Commerce/ProductKeyStart.aspx?ms.officeurl=setup365

Volume License renew can change to use credit card, temporary i still don't know how to change credit card renew to volume license key, i should waiting the term end date to try the options..


How long about Volume license purchase process
Purchase the volume license, Vendor/Partners just take within few working hours to place the order from Microsoft, user will get the following e-mail for activate the product, actually almost next working day you will got the license from e-mail.


Start the Activation Process

Step 1. - After order the license, you will receive above mail, you can click "Please click here to get started with your online service."


Step 2. - Check your Organization Name if correct, click the below "Sign-in with your domain name"


Step 3. - You will see the following product key, please copy and paste copy the product key, don't use "Start Activation"

 Step 4. - https://portal.office.com/admin/default.aspx << Sign-in Admin Portal, on Left Panel select "Billing" > "Subscription", select the subscription you wish to renew, on right panel click "Renew or add user license"


Step 5. -  Choose "Use a new and unused product key"


Step 6. - Enter the product key

Step 7. - You can renew current subscription or add 1 user license, the following will explain more about the difference.

Add new user license on existing subscription can apply on the following situration :
 - This is a way to change online payment back to volume license 
 - Add new user license and make all license as same term end date, you can check the picture description how to calculate the service month if you add the new license.

Renew your subscription just is renew only.