顯示具有 Server 標籤的文章。 顯示所有文章

2017年9月18日 星期一

GPO Software Installation

New a policy for Software Deploy, e.g. "MYS - Windows 7 x64 Deploy"
Right click Organization > Link Existing GPO and select new create policy 

Edit "MYS - Windows 7 x64 Deploy"

New Packge on Software Installation, it will auto install the package when user login


Deployment state if select "Publish", user computer will not auto install, but they can find the application on Control Panel > Programs and Feature > "Install a program from the network"


The Software Installation only run once only, if user uninstall the application must manual install again, 

The following action allow the system auto install the deploy software again.
Simply delete corresponding key from:
HKEY_LOCAL_MACHINE\SOFTWARE\Microsoft\Windows\CurrentVersion\Group Policy\AppMgmt


2017年9月15日 星期五

Quick Fix Windows Problem


Enable Windows Task Manager when Disabled by a Virus

Open Group Editor Policy by Clicking on Start, then click Run and type in gpedit.msc and press OK. Once in the Group Policy Editor, expand in turn: User Configuration > Administrative Templates > System > Ctrl+Alt+Del Options On clicking Ctrl+Alt+Del You will have four option on right hand side. Double click on Remove Task Manager to change its setting: Click on Not Configured and then OK and Task Manager is available once again.


Some user can't login / The sign-in method you're trying to use isn't allowed. For more info, contact your network administrator.

Open Local Security Policy by Clicking on Start, then click Run and type in secpol.msc and press OK. 
Once in the Local Security Policy, expand in turn: Local Policies > User Rights Assignment
on clicking "Deny log on locally" on right hand side, make sure your user not here, if here just remove it and problem should solve. if the problem user account name not here,
on clicking "Allow log on locally" on right hand side, add the user allow log on locally.

2017年3月4日 星期六

Windows Server 2003 Uselful GPO

Assign Domain Users as a Client Computer Local Administrators and Remote Desktop Users


Assign Domain Users as a Client Computer Local Administrators and Remote Desktop Users

Advantage : 
This domain users have local computer right to install software on client computer, but this user no permission on server.
Disadvantage : 
For the security risk, this user password should only handle by admin/support staff, even this account can't harm server, but this login can access/remote any local computer.
Source : This is original source and more detail about the step.
https://social.technet.microsoft.com/wiki/contents/articles/7833.how-to-make-a-domain-user-the-local-administrator-for-all-pcs.aspx#Step_4_Linking_GPO


Step 1 : Creating a Security Group
First you need to create a security group called Group_Support

 - Create a security Group name it Group_Support. 
 - Create a Domain Users and add as Group_Support member.

Step 2: Create Group Policy.
Next you need to create a group policy called “MYS GPO”

 - Open Group Policy Management Console ( gpmc.msc )
  - Right click on Group Policy Objects and select  New. 


Type the name of the policy "MYS GPO"


Step 3: Configure the policy to add the “Group_Support” group as Administrators

Right click “MYS GPO” Policy then select Edit.


Expand Computer configuration\Policies\Windows Settings\Security Settings\Restricted Groups
In the Left pane on Restricted Groups, Right Click and select “Add Group“


In the Add Group dialog box, enter Group_Support and click ok to close the dialog box.


Click Add under “This group is a member of:”
 Add the “Administrators” Group.
 Add “Remote Desktop Users”
 Click OK twice


NOTE# When adding groups, you can add whatever you want, the GPO will match the group on the system, if you type “Admins” it will match a local group called Admins if it exists and put “Support_Group” in that group.

Step 4: Linking GPO

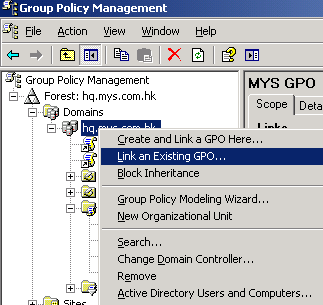
In Group policy management console, right click on the domain or the OU and select Link an Existing GPO


Select the MYS GPO


Step 5: Testing GPOs

Log on to a PC which is join to the domain and then run gpupdate /force and check the local administrators group. You should see Group_Support in that group now. Make sure all PCs you want to access should be move to an OU and properly link above GPO. Tom and Bob domain users can now access all PCs remotely as a local administrator.

Important Remark : 
If you rename Group_Support, the GPOs will update as same. 


2015年11月13日 星期五

Domain Group Policy Deploy Printer for all client PC

First we should install the printer on Windows Server and share the printer

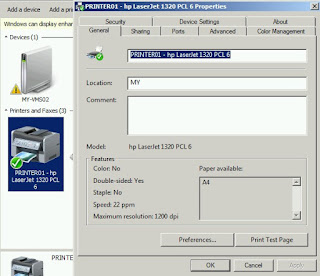
For good to management, you should plan the printer name and share name, if you have two hp Laserjet 1320 printer, every printer you should assign the name such as "PRINTER01" and "PRINTER02" for difference printer.

For Example : (If you not desire the good name, after your company grow and have a lot of printer, you will need to change back the name, it will make you crazy)
PRINTER01 - hp LaserJet 1320 PCL6
PRINTER01 - hp LaserJet (For Account Statement Format)


Click "Sharing", share name use p_printer01 for starting, other you can use p_printer01_a, etc...
(about the permission, here will not explain too much, please search on google)
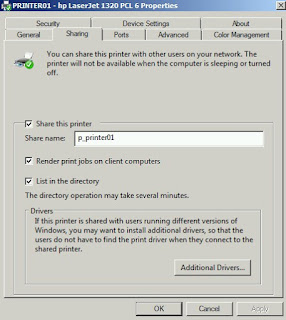


Remember Additional Drivers should installed x64 & x86 for difference OS
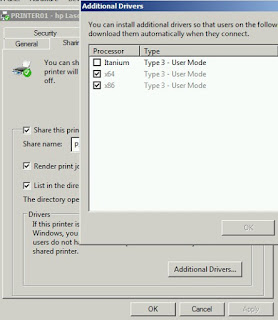


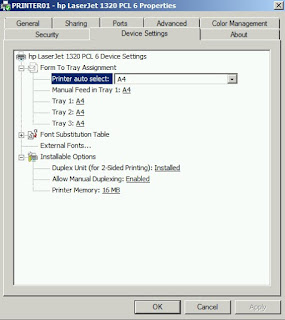
You should preset the printer before deploy it, once computer connected it will assign all setting.


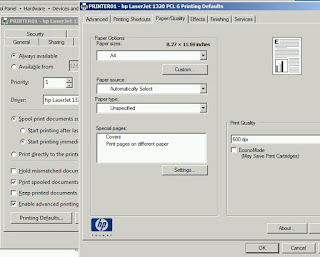
Advanced page > Printing Defaults


-----------------------------------------

Open the Group Policy Management > Click "Default Domain Policy" > right hand side click "settings"
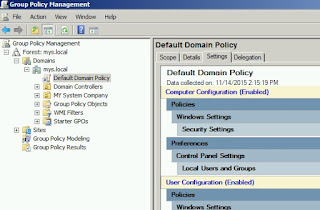


Right click mouse and click "Edit"
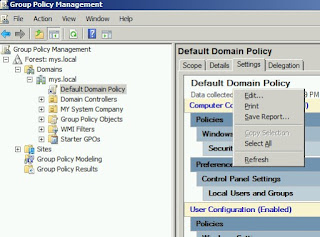


Here have two method to connect the printer, First is using Deploy Printer and Second is Connect to Printer

Method 1 : (Caution it will become many trouble if you change printer/share name)
Advantage
 - Client can't delete the printer
Disadvantage
 - If someone on server rename the printer/share name, change drive may cause client computer can't remove the deployed printer, if will hard to fix if you got a lot of client machine, so you should very understand what are you do on this method.

Under Group Policy > User Configuration > Windows Settings > Depolyed Printers > Click "Deploy Printer"
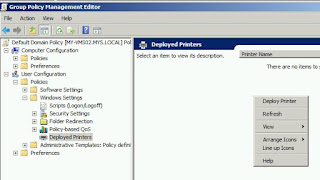


Type the link and add, then click "OK", after computer restart and login, it will connected and auto install the driver on client machine.
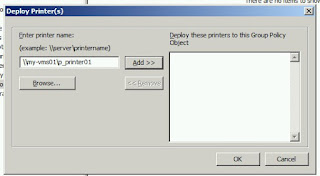


Remark :
 - Client Computer should no right to remove deployed printer
 - If you remove deployed printer on Policy, all client should automatically remove printer on client machine, the driver will still leave on client machine.
 - If you need to change the printer/share name, you should create a new share printer and deploy a new printer, don't just change name on printer, it will loss connection.
 - If printer is gone or replaced new printer, you can remove deployed printer on policy, but i suggest don't delete and change printer/share name, just leave here and keep at least a year to make sure all client machine is removed deployed printer.


Method 2 : 
Advantage
 - Easy to management, user allow to delete the printer
Disadvantage
 - Client Machine can't get driver for server, so if your computer does not have same driver installed, the printer will not connect.

Under Group Policy > User Configuration > Preferences > Control Panel Settings > Printers > Right Click "New" > "Shared Printer"
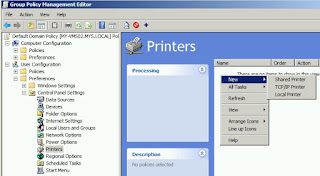


Action "Create", Type the Share name and OK
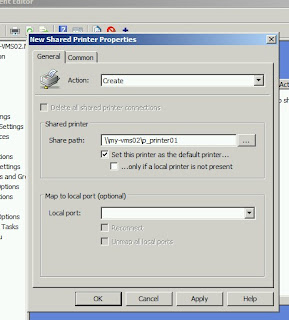


 Remark :
 - This is same as you type \\my-vms01\p_printer01 on CTRL+R, but it will always connect after login the computer even you delete the printer.
 - You should already installed the printer driver on computer else it will not work and prompt the driver install screen.


2015年11月10日 星期二

File Replication Services Ntfrs Error / Domain can't sync SYSVOL

CAUSE :
 - Already have Windows 2003 Domain Controller, add one Windows 2008 R2 and promo to Active Directory, Event show Ntfrs error can't sync SYSVOL.
 - 新加入2008 R2的Domain Controller到2003 Domain Controller上,但發現SYSVOL無法同步,\\servername\ 沒有sysvol等資料夾

Resolution (The following action is same, but came from difference website, Point 3 will easy to understand)
1. https://social.technet.microsoft.com/Forums/windowsserver/en-US/5a4b3647-0641-4a1a-9389-154d92b44730/the-file-replication-service-is-having-trouble-enabling-replication?forum=winserverDS

2. http://www.eventid.net/display.asp?eventid=13508&eventno=349&source=ntfrs&phase=1

3. http://www.squidworks.net/2011/09/ntfrs-journal-wrap-errors-detected-on-domain-controller/


2015年1月7日 星期三

SQL Error 1814 / Change tempdb path / How to start SQL Server if you lost TEMPDB Data files?

Source from : http://blogs.xtivia.com/home/-/blogs/how-to-start-sql-server-if-you-lost-tempdb-data-files-

Following are the steps needed to add a new file to TEMPDB and then restart SQL Server.
1)   Open command prompt window #1 as ADMIN and go to the BINN directory where SQL Server is installed. This is typically in
 
C:\Program Files\Microsoft SQL Server\MSSQL10_50.MSSQLSERVER\MSSQL\Binn
OR
C:\Program Files\Microsoft SQL Server\MSSQL.1\MSSQL\Binn
 
2) Then execute command like
       Sqlservr.exe /f /c  

3)   Then open one more command window #2 and if this is a default instance then open SQLCMD  using the following command
SQLCMD –S localhost –E

4)   This will open a SQL command prompt there where you can type the following commands
      
1> USE MASTER
2> GO
3> ALTER DATABASE tempdb MODIFY FILE
4> (NAME = tempdev, FILENAME = 'd:\tempdb\tempdb.mdf')
5> GO 
6> ALTER DATABASE tempdb MODIFY FILE
7> (NAME = templog, FILENAME = 'd:\tempdb\templog.ldf')
8> GO 
9> quit

5)   Now go back to Command window #1 and hit CTRL C.
It will ask if you want to stop the instance. Y/N.
Enter Y, Please close all Command Prompt before start the services
6)   Now start the SQL Server instance from configuration manager. You should see the new data file created and SQL Server started.

2014年11月19日 星期三

Microsoft 推出緊急補丁修補 Windows Server 嚴重漏洞

https://technet.microsoft.com/library/security/MS14-068

黑客搖身一變網域管理員
Microsoft 指,是次修補的漏洞編號為 CVE-2014-6324,將允許黑客攻擊 Windows 網域,由遙距升級獲取使用者權限,繼而藉此得到網域上任何帳號的權限,當中包括網域管理員帳號,令黑客由沒有權限的用戶搖身一變成為網域管理員。
受影響的軟件包括 Windows Server 2008R2 以下版本的網域控制器、Windows Server 2012 以上版本最為嚴重;Windows Server 2003、Windows Server 2008、Windows Server 2008 R2、Windows Server 2012 及 Windows Server 2012 R2 的安全風險均為嚴重。而 Server 2012 以上各版本的網域控制器亦非完全安全,但風險相較之下則較為低。
轉自 : UNWIRE.PRO
http://unwire.pro/2014/11/19/windows-server-kerberos/

2014年3月3日 星期一

NVR Storage Calculator for IP CAM

Calculator Website
http://www.supercircuits.com/resources/tools/security-nvr-storage-calculator


2013年4月17日 星期三

Synology NAS PPTP Function

VPN Server (PPTP)
Demo Version : DS-410J with DSM 4.2 (3202)
Maximum Connection Limitation : 5, 15, 20 & 30 **

 - Installation and Configuration

1. Click "Menu" > "Package Center"

2. Left Panel click "Utilities" > Right Panel Install "VPN Server"

3. Click "VPN Server" on Synology Desktop after installed
 

4. General Settings, Interface is your LAN Port IP, if you don't want all/new user have PPTP access function, please unclick "Grant VPN privilege to newly added users"

5. Privilege, you can check which user is granted the privilege to access PPTP

6. PPTP, For Microsoft Windows, please follow up the picture for setting. **

7. Connection List, you can check which user are connecting to PPTP now.


** It depend on your model have difference maximum connection limit.
http://www.synology.com/releaseNote_enu/package_VPNServer.php?lang=enu

VPN Server Connection Guide from Synology
Synology Official Website

後話 : 測試硬體為 Synology DS-410J 這型號除最大限制5人連線外, 連線速度十分不如理常, 即是假如你買低級的NAS回來什麼都不做, 只做PPTP效果亦不理常!!!  這些功能真是Optional不能用來作主要功能及賣點!