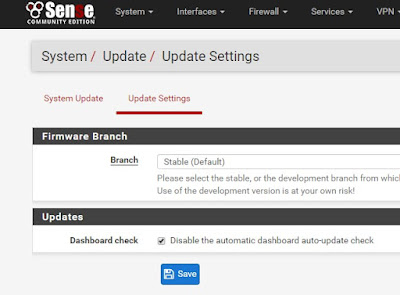
Try Disable Updates Check on Dashboard under "System > Update > Update Settings"
2017年2月26日 星期日
2017年2月24日 星期五
pfsense SSD Harddisk Enable TRIM
The first, you should identify your TRIM is enabled or disabled.
WebGUI Interface > Diagnostics > Command Prompt
You also can press [8] on VGA console and type command "tunefs -p /"
tunefs: POSIX.1e ACLs: (-a) disabled tunefs: NFSv4 ACLs: (-N) disabled tunefs: MAC multilabel: (-l) disabled tunefs: soft updates: (-n) enabled tunefs: soft update journaling: (-j) enabled tunefs: gjournal: (-J) disabled tunefs: trim: (-t) disabled tunefs: maximum blocks per file in a cylinder group: (-e) 4096 tunefs: average file size: (-f) 16384 tunefs: average number of files in a directory: (-s) 64 tunefs: minimum percentage of free space: (-m) 8% tunefs: space to hold for metadata blocks: (-k) 6408 tunefs: optimization preference: (-o) time tunefs: volume label: (-L)
OK Now going to enabled TRIM
Now reboot your pfsense to Single User, when the following screen prompt up, Press "2" or "S" to boot Single User.
__ ____ _ __ / _/ ___| ___ _ __ ___ ___ | '_ \| |_\___ \ / _ \ '_ \/ __|/ _ \ | |_) | _|___) | __/ | | \__ \ __/ | .__/|_| |____/ \___|_| |_|___/\___| |_| +------------Welcome to pfSense-----------+ | | ______ | 1. Boot Multi User [Enter] | / \ | 2. Boot [S]ingle User | _____/ f \ | 3. [Esc]ape to loader prompt | / \ / | 4. Reboot | / p \______/ Sense | | \ / \ | Options: | \_____/ \ | 5. [K]ernel: kernel (1 of 2) | \ / | 6. Configure Boot [O]ptions... | \______/ | | | | | | +-----------------------------------------+
run shell command "cat /etc/fstab", show the following device, write down the highlight red color string, FStype is ufs.
cd /
cat /etc/fstab
# Device Mountpoint FStype Options Dump Pass# /dev/ufsid/58b03b253575d41a / ufs rw 1 1 /dev/label/swap0 none swap sw 0 0
Type the following command, highlight red color string should same as above.
# /sbin/tunefs -t enable /dev/ufsid/58b03b253575d41a
then press enter, if success will show the following message.
tunefs: issue TRIM to the disk set
then type reboot and verify the TRIM status again.
# /sbin/reboot
Source from : https://gist.github.com/mdouchement/853fbd4185743689f58c
2017年2月17日 星期五
UniFi Controller Run as Windows Services and UniFi Cloud Access got Error : An error occurred. Cloud access is not compatible with this OS architecture
This page is slowing how to let UniFi Controller run as Windows Services and it also can fix can't enable the Cloud function.
Link
UniFi Account Page : https://account.ubnt.com
UniFi Cloud Access Page : https://unifi.ubnt.com/#/
Enabled UniFi got problem and get "An error occurred. Cloud access is not compatible with this OS architecture."
Step 1 :
- Make sure you already create account on UniFi
Step 2 :
- You need install update both x86 & x64 Java
Step 3 :
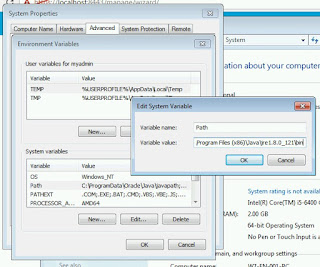
- add "C:\Program Files (x86)\Java\jre1.8.0_121\bin" to Path on "Environment Variables..."
Step 4 :
Remark :
After run as services, you don't need to open UniFi shortut ("%username%\Ubiquiti UniFi\lib\ace.jar" ui), if you double click open the UniFi Controller Windows, please click "Hide", if you close this windows and click yes to confirm close the UniFi Controller, the services will close and you would not get the connection on Browser.
Link
UniFi Account Page : https://account.ubnt.com
UniFi Cloud Access Page : https://unifi.ubnt.com/#/
Enabled UniFi got problem and get "An error occurred. Cloud access is not compatible with this OS architecture."
Step 1 :
- Make sure you already create account on UniFi
Step 2 :
- You need install update both x86 & x64 Java
Step 3 :
- add "C:\Program Files (x86)\Java\jre1.8.0_121\bin" to Path on "Environment Variables..."
Step 4 :
- Close any instances of the UniFi software on the controller
- Open the command prompt as an Administrator
- Run Command Prompt as an Administrator, then change directory to the location of UniFi in your computer, using the command:
cd "%UserProfile%\Ubiquiti UniFi\" - Once in the root of the UniFi folder, issue the following:
java ‐jar lib\ace.jar installsvc
Step 5 :
- Restart a computer, now you can access https://localhost:8443 without turn on the UniFi Controller
Remark :
After run as services, you don't need to open UniFi shortut ("%username%\Ubiquiti UniFi\lib\ace.jar" ui), if you double click open the UniFi Controller Windows, please click "Hide", if you close this windows and click yes to confirm close the UniFi Controller, the services will close and you would not get the connection on Browser.
2017年2月9日 星期四
About Copier Support ( Xerox / Ricoh / Canon )
Fuji Xerox Customer Hotline : 2513-2513
Fuji Xerox Information :
Default Admin ID : 11111
Web Admin ID : 11111
Web Admin Password : x-admin
Error Code :
016-749 - Printer Driver not support (for example using PS driver when print out show this message that mean the Copier does not support PS)
Reset and Clean Cache
- Hold "Start" and "Stop" Button (Green+Red Button), switch Power Off the Copier, it will automatically start the machine again and clean the cache.
2017年2月5日 星期日
訂閱:
文章 (Atom)