2015年3月6日 星期五

Where can i find my OSA key


1. Sign in your Volume Licensing Service Center, if you do not have the account, please sign up now.
https://www.microsoft.com/licensing/servicecenter/default.aspx

2. Please make sure you already add the license to your account, you can click Licenses > Relationship Summary > then click Add Open License to add the license


3. Click Online Service Activation, select the License ID and click Manage Activations 


4. click Sign-in with xxxxxxx.xxx << Your domain


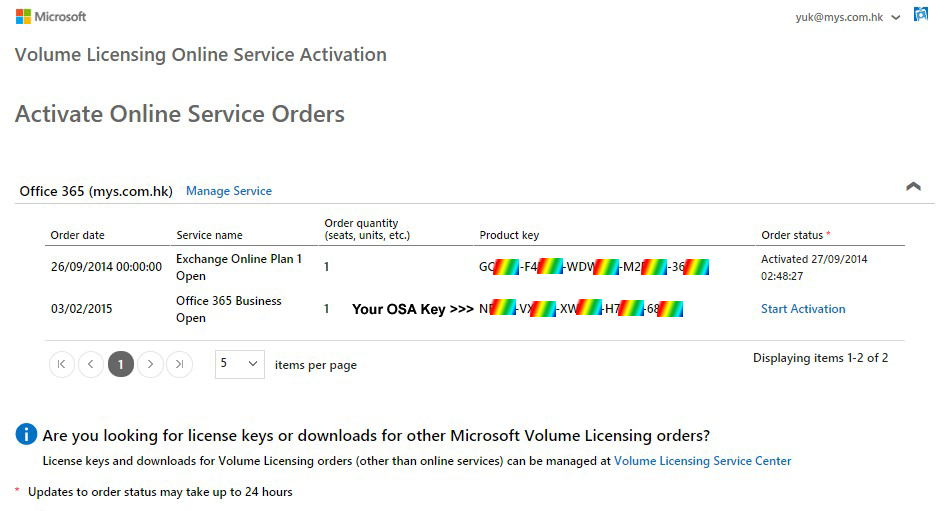
5. You can find your OSA key and you can click "Start Activation" to activate your product, or try redeem instruction.


If you got any problem for Microsoft Volume Licensing, you can contact Microsoft Volume Licensing Support

2015年3月5日 星期四

How to Activate Your Office 365


1. Go to https://portal.office.com/commerce/productkeystart.aspx

2. Click the box that you are acknowledge and got permission to be the Office 365 administrator for the organization, then click on Start.
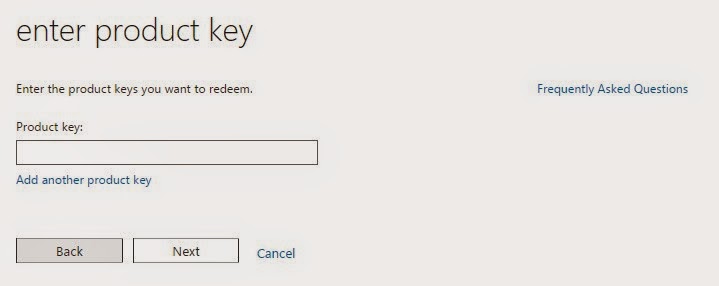
3. Enter the OSA key from the step one, then click on Next.

Where can i find my OSA key?


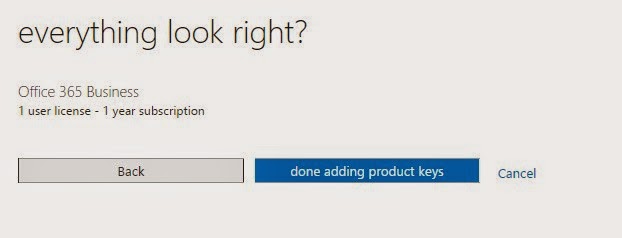
4. click done adding product keys


5.       click start step 2

6.       You can set up your new Office 365 account or click sign in to login existing account


2015年3月4日 星期三

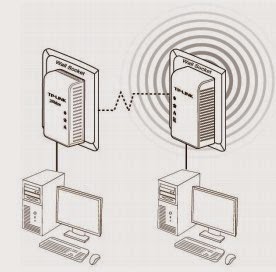
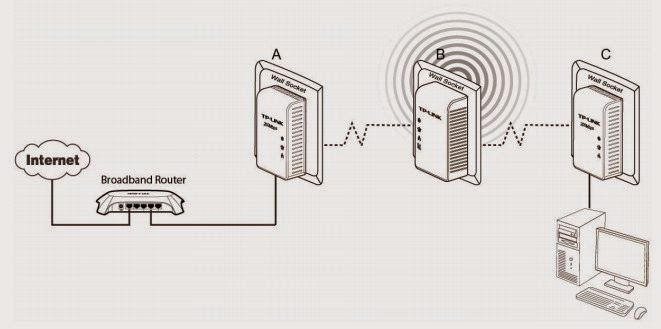
TP-Link WPA271KIT HomePlug Information


Create a Powerline network using the Pair button

You can connect a number of devices on a powerline network, but you can use the Pair button on only two devices at a time.

Step 1. Press and hold the Pair button of Powerline device A TL-PA211 for 3 to 8 seconds, the Power LED will start flashing.

Step 2. Press and hold the Pair button of Powerline device B TL-WPA281 for 1 second, the Power LED will start flashing. (This must be done within 120 seconds after pressing the Pair button of Powerline device A.)

Step 3. Wait for about 60 seconds while your Powerline device A and B are connecting. The Power LED on both devices will stop flashing and become solid light when the connection is made.


Join an existing Powerline Network:

Powerline device A and Powerline device B form a HomeplugAV Network, and Powerline device C wants to join this network.


Step 1. Press and hold the Pair button on Powerline device C TL-PA211 for 3 to 8 seconds.

Step 2. Press and hold the Pair button on Powerline device A/B for 1 second/3 to 8 seconds. (This step must be taken within 120 seconds after step 1 is finished.)

Step 3. Wait for about 60 seconds while your Powerline devices are connecting. The Power LED on Powerline device A/B and C will stop flashing and become solid light when the connection is made.


Leave an existing Powerline Network: 

As the figure above shows, Powerline device A, B and C have formed a HomeplugAV Network. The user wants to remove one device (Powerline adapter C) from this network.

Step 1. Press and hold the Pair button on Powerline device C for at least 10 seconds. Powerline device C will reset and restart.

Step 2. Wait for the reset to complete.


Reset 
To reset the Powerline device:

Press and hold the Reset button for about 10 seconds, and then release the button. You will see all LEDs begin to flash. At this moment, the default settings have been restored. Be careful, don’t power off when the device is in reset process.

2015年2月28日 星期六

iPhone 6 爆Monitor 維修

28-Feb-2015 今日跌爆左個iPhone 6以下是維修時需知,價錢及程序!  跌爆Monitor當日好急,返左屋企做完Backup即刻就去左Retail Store,點知排隊都只係做Booking預約,約左2-Mar-2015。
2-Mar-2015 預早11:55己經去到Apple Store,姐姐仔來幫我登記及料解情況,其實視乎損壞情況啦,因為隨爆Mon外,機身多處位置都花了,如果沒有存貨可更換手機的話,我就換Mon算啦,適逢有貨所以俾$2368成部換左去,當然換機佢一定唔係俾賣街packing的iPhone你,佢係俾維修更換用packing的iPhone,即係Apple佢地認證過全新或番新既iPhone,呢點大家要留意因為係番新所以要驗清楚,收左貨出左門口有問題你行返入去佢唔會換俾你,只會做維修,我收到第一部機即彈,Screen內有一粒黑點的塵,第二部才收貨。


 維修程序
   
- 先致電Apple Support預約維修 iPhone, 如果你 Walk-in 去Apple Shop除非冇人做維修啦,如果唔係你去到就係排隊做booking.

- 如果手機仲可以開到機請先用電腦 iTunes把 iPhone Backup一次先,如果你平時做開個Backup就好快攪掂,如果你從來冇做過,個backup可能要做1-2個鐘視乎你有幾多Data。#註1

- 預約好日期維修當天需準時到Apple Retail Store 交付手機驗查及報價,維修約需時48小時,如更換手機則視乎存貨,有存貨可以即時更換,費用一般如下 :

以下是保養期內意外跌爛iPhone Monitor Screen費用
$848 更換 iPhone Screen (如iPhone Case灣曲導致不能更換Monitor Screen則需整部手機更換。
$2368 更換整個 iPhone 手機 (注意是維修用的全新或番新iPhone,包裝與零售版本不同)
$868及$2368基本上係與保養無關,即係買機到手未滿7天/未滿一年/過晒保養都係呢個價錢,因為跌爛並唔係本身機件問題,係人為損壞。
$548 更換整個 iPhone 手機 (只限 AppleCare+)
*** 任何並非人為損壞Apple保養是包含在內的,如果你的iPhone是明顯坐灣左,應該係計算在人為損壞,如果好輕微灣曲如玉眼不能分辨出來,我個人認為可以懶產品質量問題要求維修或更換,iPhone內多處位置都有試水紙,如因入水導致損壞係講唔過的。

 - 維修或更換完手機回家用iTunes restore backup便可以還原所有資料。


 (以上係2015年我更維修iPhone6價錢參考好啦)


AppleCare Plus
如果你係全新手機及購買未滿60天,你可以購買額外既AppleCare+ $688 , 需另外俾$548元意外保障就可以更換成部手機,但只限兩次!抵唔抵就視乎你點玩,如果你係裸跑朋友,我建議買機時一定要買埋AppleCare+,裸跑一至兩年部機一定由頭花到尾,介時換其他手機想把現有手機乾乾淨淨俾屋企人用俾多$548就ok, 或你有心理準備一定跌爛AppleCare+一定抵D。


 *** 注意必需在購買手時一拼購買或購買後60天內到Retail Store購買,Retail Store會驗查你購買紀錄及驗查手機沒有損壞才能成功購買。


#註1
關於備份,所有的備份是不會儲存密碼的,當回復手機後,電郵帳號,Wi-Fi密碼等等都需要重新輸入密碼,另外App內的設定大部份都會同備份前相同,但如果是Game的話如Chain Chronicle是必需用引繼才可以取回帳號,其他如Puzzle & Dragon則可以放心備份回復。

2015年1月19日 星期一

How to setup Linux/ABC e-mail account to your iPhone's

1. Click "Setting" on your iPhone's

2. Click "Mail, Contacts, Calendars"

3. Click "Add Account" and click "Other"


<<<<<<<<<<<<<<


4. Click "Add Mail Account"


 <<<<<<<<<<<


5. Enter the following information :

Name :   << This is sender name >>
E-Mail :   << Enter your e-mail address >>
Password :   << Enter your password >>
Description :    << This is name for display your mail account >>, check the right side picture!


6. You need to choice which mode do you want to connect with e-mail account

Please enquire your administrator which mode is better for you, but I will suggest using POP.

The following screen you only need to care the Incoming & Outgoing Mail Server :
Incoming Mail Server Host Name is : mail.abchk.com or mail.asa.com.hk or mail.yourdomain.com
Outgoing Mail Server Host Name is : smtp.abchk.com or smtp.asa.com.hk or smtp.yourdomain.com


P.S. Some time when you click "SAVE" it will wait a long time to validation of your account setting, just wait it.


7. After add the account, you should click to the mail account for checking SMTP setting.


<<<<<


8. Click "SMTP"


<<<<<<<<<<<


9. Click the Primary Server "smtp.abchk.com"


<<<<<<<<<<


10. Make sure your outgoing mail server setting have username and password, and server port must using 465, if server port is 25, sometime you can sent out e-mail, but i guess will always fail, depend on your existing internet connection, because most ISP will block the Port 25 for outgoing mail services.


<<<< 465


How to setup Exchange Online / Office 365 e-mail account to your iPhone's

Remark : If you are using Andriod Phone and it can't automatically discovery the setting, please click here to follow the instruction complete your setting.

1. Click "Setting" on your iPhone's

2. Click "Mail, Contacts, Calendars"

3. Click "Add Account"


4. Click "Exchange"


5. Enter your e-mail address, password and description.
Description is what name you want to display on Mailboxes list, check right side picture, such as "iCloud" & "MYS"


6. You can enable what function you need.


7. Check this picture, you will see "MYS" seperate on upper and down side, the difference is upper only show inbox and latest e-mail only, down side will connect to Exchange Online/Office 365 server and show all e-mail and folder


2015年1月7日 星期三

SQL Error 1814 / Change tempdb path / How to start SQL Server if you lost TEMPDB Data files?

Source from : http://blogs.xtivia.com/home/-/blogs/how-to-start-sql-server-if-you-lost-tempdb-data-files-

Following are the steps needed to add a new file to TEMPDB and then restart SQL Server.
1)   Open command prompt window #1 as ADMIN and go to the BINN directory where SQL Server is installed. This is typically in
 
C:\Program Files\Microsoft SQL Server\MSSQL10_50.MSSQLSERVER\MSSQL\Binn
OR
C:\Program Files\Microsoft SQL Server\MSSQL.1\MSSQL\Binn
 
2) Then execute command like
       Sqlservr.exe /f /c  

3)   Then open one more command window #2 and if this is a default instance then open SQLCMD  using the following command
SQLCMD –S localhost –E

4)   This will open a SQL command prompt there where you can type the following commands
      
1> USE MASTER
2> GO
3> ALTER DATABASE tempdb MODIFY FILE
4> (NAME = tempdev, FILENAME = 'd:\tempdb\tempdb.mdf')
5> GO 
6> ALTER DATABASE tempdb MODIFY FILE
7> (NAME = templog, FILENAME = 'd:\tempdb\templog.ldf')
8> GO 
9> quit

5)   Now go back to Command window #1 and hit CTRL C.
It will ask if you want to stop the instance. Y/N.
Enter Y, Please close all Command Prompt before start the services
6)   Now start the SQL Server instance from configuration manager. You should see the new data file created and SQL Server started.