2016年10月30日 星期日

Windows Live Mail Migration 遷移及需注意事項

First, you should watching this video to understand how to transfer and i will explain how and why.

https://www.youtube.com/watch?v=96R86ZbBvHA

注意 :
1. 除上的影片教學外, 我不建議其他方式的遷移, 因為只有這個方法是最完整及最小問題出現
2. 這個遷移只限 Old PC to New PC 並使用Windows Live Mail
3. Windows Live Mail 以下會簡稱 WLM
4. Windows 程式集 2012 套件將於 2017 年 1 月 10 終止支援
下載連結 : http://go.microsoft.com/fwlink/?LinkID=255475


遷移步驟 :
1. WLM 預設的資料檔資料夾包含 Mail + Calendar + E-Mail Account Setting, 並不包含Contact List.

頂設資料夾位置 :
%userprofile%\appdata\local\windows live mail\
e.g. : 
C:\Users\sales11\appdata\local\windows live mail\  << If this is Windows 7 and username is sales11

如這個地方找不到你的郵件資料夾, 可以在WLM執行後查詢
WLM 功能表 > 選項 > 郵件 > 進階 > 維護 > 郵件檔資料夾


2. 關閉WLM程式, 把整個資料夾Copy到新電腦或硬碟

3. 新的電腦先開啟已安裝好的WLM, 跟從步驟1找到資料夾後, 把WLM程式關閉並刪除Windows Live Mail資料夾, 把需要遷移的資料夾補上便可

4. 開啟WLM時可能會出現密碼不正確, 請輸入密碼一次便可, 要注意如果資料夾Size很大的話, 開啟WLM需等待一段時間

Q&A
Q: 我討厭WLM如果我需要Migrate 到其他軟件有什麼選擇?
A: 基本上沒有軟件支援 Import WLM的郵件, 但WLM有Export功能到Microsoft Outlook

Q: 如果舊電腦已經壞了, 不能啟動電腦可以怎麼辦?
A: 程序一樣, 把舊電腦的硬碟內的Windows Live Mail資料夾copy出來照做便可

Q: 我的WLM郵件太大, 我只想遷移部份資料夾, WLM內有Import & Export功能這樣不是更方便嗎?
A: 我會建議你先把不要的郵件及資料夾在WLM內先delete及清空垃圾桶再跟上面的程序去migrate, 不建議使用Import & Export, 因為import及export時會經常出現找不到文件而失敗, 而import and export不會以你WLM內的資料夾結構作import & export, 及後你會發現找不到你的郵件, 如 WLM內的一個資料夾名稱為 "Master Record for IT Purchase" 在import & export後這個資料夾名稱會變成 "Master Re b3b" 當你有數十個很長名稱的folder變成你看不懂的folder你會後悔使用import and export.


最後總結 :
我絕不建議使用 WLM, 如更換新電腦請使用Microsoft Outlook 或使用Webmail, 這個Migration的用意是方便查看舊的e-mail, 如migrate到新電腦依然使用 WLM的話, 會出現很多問題.

2016年7月26日 星期二

Office365 Powershell Disable Clutter

Enter the Powershell with administrator right

https://technet.microsoft.com/en-us/library/jj984289(v=exchg.160).aspx

Connect to Exchange Online

  1. On your local computer, open Windows PowerShell and run the following command.
    $UserCredential = Get-Credential
    
    In the Windows PowerShell Credential Request dialog box, type your Office 365 user name and password, and then click OK.
  2. Run the following command.
    $Session = New-PSSession -ConfigurationName Microsoft.Exchange -ConnectionUri https://outlook.office365.com/powershell-liveid/ -Credential $UserCredential -Authentication Basic -AllowRedirection
    
    Note   If you are an Office 365 operated by 21Vianet customer in China, use the following value for the ConnectionUri parameter:https://partner.outlook.cn/PowerShell.
  3. Run the following command.
    Import-PSSession $Session
    
noteNote:
Be sure to disconnect the remote PowerShell session when you're finished. If you close the Windows PowerShell window without disconnecting the session, you could use up all the remote PowerShell sessions available to you, and you'll need to wait for the sessions to expire. To disconnect the remote PowerShell session, run the following command.

To Enable or Disable Clutter for one user

To enable clutter for one user run:
PS C:\Scripts> Set-Clutter -Identity user@domain.com -Enable $true
To disable clutter for one user run:
PS C:\Scripts> Set-Clutter -Identity user@domain.com -Enable $false

To Enable or Disable Clutter for all users

To enable clutter for all users run:
PS C:\Scripts> Get-Mailbox | Set-Clutter -Enable $true
To disable clutter for all users run:
PS C:\Scripts> Get-Mailbox | Set-Clutter -Enable $false
Some users have reported that they do not have access to this cmdlet within Microsoft Office 365. Hopefully they will receive access to it shortly

2016年6月30日 星期四

New PC setup need install application

Document and Office Work
     Adobe Reader (Online Install Page / Offline Installation Download Page)
     Skype ( Installer Download )
     Microsoft Office 2010 Starter (Chinese / Word + Excel limit function with AD)
      - http://www.mediafire.com/?zn4qpi3qst1hkvj
      - https://1drv.ms/u/s!AnFIeqrGhmqcj4laSm6oEEczuBsNcQ

Mail Client
     Thunderbird ( EN Installer Download / CH Installer Download )

Browser
     Google Chrome ( Online Install Page / Office Download Page )
     Internet Explorer 11 for Windows 7 ( Installer Download )
     Firefox ( EN Installer Download / CH Installer Download )

Windows Basic Need
     7-Zip ( Official Web / 32-bit download / 64-bit download )
     Java (Online Install Page / Offline Download Page / 32-bit Download / 64-bit download )

Anti-Virus / Malware
     Malwarebytes ( Official Web / Download Free Trial )

Other 
     Teamviewer QuickConnect Client ( Quickconnect Download / Instruction )
     Enable / Disable Windows 10 Upgrade ( Instruction )
      - http://ultimateoutsider.com/downloads/GWX_control_panel.exe
      - http://ultimateoutsider.com/downloads/
      - https://1drv.ms/u/s!AnFIeqrGhmqcj4lbe7rXtnKs7kb-Cw

2016年6月15日 星期三

Exchange Online how to setup forward e-mail to outbound recipients without e-mail account


1. Login https://portal.office.com with admin right account

2. Application Menu > Admin Icon > Admin Centers > Exchange > Recipients


3. On Contacts, create outbound contacts
 - create outbound contact first so we can configure the forward later


PS. This is outbound contact


4. On Groups, create a distribution groups and assign member for forward

 - create distribution group


- in Members, you can add the contacts on members list, previous we already create a contacts, so we can add here


5. after create a distribution group you should edit and make it work from inside and outside sender.

- in "delivery management", should click "Senders inside and outside of my organization"

 - on "email options" you can add/remove forward account.

For Example :
current is support@davidfongco.com.hk forward to support@my-system.com.hk
here you can add more address such as it@davidfongco.com.hk, so support & it @davidfong incoming mail will forward to support@my-system.com.hk.

If you want forward to outbound more recipients, you should create more outbound contacts and edit from membership page.


2016年5月30日 星期一

Excel File missing Sheet Tab or Scroll Bar

Sometime you may found your excel missing a sheet tab or scroll bar


Click "File"


Click "Options"


Click "Advanced" and looking "Display options for this workbook"
Click and check the "Show horizontal scroll bar"
Click and check the "Show vertical scroll bar"
Click and check the "Show sheet tabs"


2016年5月5日 星期四

Exchange 2010 憑證過期

Exchange 2010 憑證過期可以直接在UI上執行更新動作
1.開啟Exchange管理主控台\伺服器組態\點選Exchange Server名稱\確認是使用哪張憑證

2.點選該憑證應該該會有一個延展或更新的選項,點下去照步驟將.req檔案匯出

3.將.req檔案用記事本開啟,並複製所有文字(包含上下引線)

4.開啟憑證伺服器網頁,點選要求憑證->進階平正要求->用Base-64編碼->輸入剛才複製的文字並選擇網頁伺服器->提交->下載憑證
(127.0.0.1/certsrv)


5.回Exchange管理畫面,這時你會發現有一張新的憑證產生點選它並點選完成擱置,這時你需要選擇剛剛在CA匯出的檔案

指令模式
A.請先開啟Exchange命令模式用以下指令確認該憑證是否為正在使用的憑證
Get-ExchangeCertificate | FL
B.如果確認是Exchange所使用的憑證請參照下列方式延展
1.開啟 Exchange 管理命令介面視窗.

2.輸入Get-ExchangeCertificate 輸入後會列出所有的憑證,前面有一堆字串的就是 Thumbprint. 若真的無法判別時, IIS 管理員中也可以在憑證項目中找到那個過期的憑證, 而且從內容也可以找到 Thumbprint.

3.輸入Get-ExchangeCertificate | New-ExchangeCertificate -Service SMTP,POP,IMAP,UM,IIS 將所有 Exchange 2010 要用的服務都設置進去,完後會問您是否要使用之前的 Thumbprint 來更新,若沒有加 -Service 的部份, 則會出現一個 Service 的標頭等待您輸入, 這時再下 SMTP,POP,IMAP,UM,IIS 也可以.

4.Enable-ExchangeCertificate 即可啟用


轉自 http://benit.pixnet.net/blog/post/61838872 痞客邦

2016年4月11日 星期一

How to solve the slow Wi-Fi problem 如何解決 Wi-Fi 慢的問題

時下購買 Wi-Fi Router 請購買有 5Ghz Wireless Router, 只有2.4Ghz的Wireless Router其實很不在很不適合香港地方使用。

5Ghz Wi-Fi 信號的最大好處,速度比2.4Ghz快,但穿透力極差所以會怕坐房的同事接收唔到
2.4GHz Wi-Fi 信號的最大好處係穿透力高,但速度比5Ghz慢,但致命點係受干擾

當你使用手機搜尋無線時你會發現很多無線Router,基本上所有2.4Ghz 頻道內的頻譜很小,當Wi-Fi router接收到信號只會回應正確密碼的設備,不正確密碼的需不作回應但接收到信號時已使用了其頻寬,你不能想像佢絕大部份都唔係幫你做緊野,係不停咁收到信號又要reject, 所以會出現慢的情況,當你覺得隻Wi-Fi慢時,往往會考慮換隻接收勁D既Wi-Fi, 結果係你受干擾既距離更加大,死既人就越來越多,下圖係我屋企既Wi-Fi 2.4GHz (MYS)及5Ghz (MYS 5Ghz), 你可以睇到 2.4Ghz 得13條Channel, MYS係Channel 1但係其實cover到去Channel 3底層既Wi-Fi互相重疊到連名都睇唔到!  我係屋企用2.4Ghz Wi-Fi 基本上係慢到用唔到,有時download ok 50MB, upload 得0.1MB,而5Ghz Channel 基本上因為穿透力低根本收唔到隔離屋既信號所以速度及穏定性都很高!


早前購買左Apple Airport Extreme, 可以單一SSID同時接收2.4Ghz及5Ghz頻道,使用了一個多月,實在很不理常,行雙頻道本來係好好既設計,但有時係真係唔知你們的手機會接左去2.4Ghz定5Ghz, 假如去左2.4Ghz可能就會很慢, 因為係受干擾速度慢,而唔係接收唔到,所以佢唔會調返去5Ghz,因為無法控制所以我建議拆返開兩個SSID用一定會比單SSID雙頻好!

AirPort Utility > Wireless > Wireless Options > Enable 5Ghz 就可以分開不同SSID不同頻道,咁唔一定個個人都要咁做,好似上圖咁你唔拆開一定唔掂,但如果你住半山密度低基本上都唔洗點怕受太多干擾就梗係單SSID雙Channel啦。

2016年4月6日 星期三

Office 365 Exchange Online Setting

Office 365 Exchange Online Setting

Distribution Group E-Mail
 - coming

Grand permission to Staff A open Staff B mailbox
 - coming


Configure Exchange Mode for Outlook 2013/2016
Please refer the official link, watch a video
https://support.office.com/en-us/article/Set-up-email-in-Outlook-6e27792a-9267-4aa4-8bb6-c84ef146101b?ui=en-US&rs=en-US&ad=US


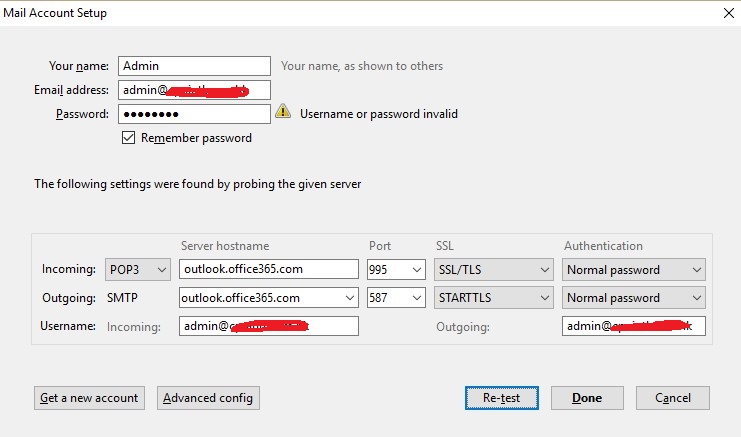
POP3, IMAP and SMTP setting
When you change E-mail services to Office365, remember you have a lot of equipment/application may not sent e-mail anymore because you need to update the smtp server name, port and username/password.


Will using SMTP equipment/application
e.g. Copier Scan to E-Mail, Server iLO/iMM/iDrac, Server/NAS/Hardware/Software application warning/error notification e-mail.


If you’re connecting to your Office 365 for business email, you don’t need to look up your settings. For Office 365 for business, use the following settings.

* Some clients refer to implicit TLS as SSL.

source from https://support.office.com/en-us/article/Outlook-settings-for-POP-and-IMAP-access-for-Office-365-for-business-or-Microsoft-Exchange-accounts-7fc677eb-2491-4cbc-8153-8e7113525f6c?ui=en-US&rs=en-US&ad=US

This is sample such as configure Office 365 Pop3/SMTP mode on Thunderbird or Non-support Exchange Mode mail client.


The following problem is i tried before.


Trial / Start Office 365 Exchange Online
Problem :
Always hang on, we're not quite ready when you access the mailbox

First time register the trial Office 365 for your domain, you should using xxxxxx.onmicrosoft.com to setup a mailbox first, once everything is done and you can access the mailbox on web, then you can set your domain as default and create another user account.
I tried if i quick start a trial and setup my company domain as default and i never try access the mailbox on web, Office 365 may be can't create a mailbox for your domain, so should using onmicrosoft.com first.

Always show we are preparing a mailbox for this user


Solution :
Try change xxxxx.onmicrosoft.com is your default domain, access the mailbox then change back your company domain to default.


Mailbox Database and delete the old mail.
Current each mailbox basic is 50GB mailbox, when you delete the mail and empty the deleted item folders, you can free up more space on your mailbox, but all of your deleted item you can recovery on 30 days, that mean even you empty the deleted item, you also can recovery with-in 30day, actually on background each user have 50GB storage for store deleted item.  So what's the problem?  If background 50GB storage for recovery deleted item is full and no space, all delete the e-mail and empty the folder it will show up again, just like can't delete the mail, this is cause by user delete e-mail over 50GB with-in 30 days, the only way is call Microsoft for temporary increase the background storage or wait few day for reduce the background storage.

Problem :
E-mail come up after delete.

Cause :
User delete e-mail over 50GB with-in 30 days

Solution :
call Microsoft for temporary increase the background storage or wait few day for reduce the background storage.

2016年2月23日 星期二

MFCMAPI

http://mfcmapi.codeplex.com/

Use for check the e-mail information such as Outlook Conversation ID, Attachment

2016年2月22日 星期一

Disable Windows 10 Upgrade


1. Download a Tools
2. Run it
3. Click "Click to Disable 'Get Windows 10' App
4. Click "Click to Prevent Windows 10 Upgrades"

Remove or uninstall Language packs in Windows 10

If you wish to uninstall Language Packs, you may open a command prompt windows, type the following and hit Enter.
Lpksetup /u

The Install or Uninstall display languages panel will open.