If you double click the excel file and got the below screen, just open the excel without any file.

Try click File > Options > Advanced > General > unclick "Ignore other applications that use DDE


cscript "C:\Program Files (x86)\Microsoft Office\Office16\OSPP.VBS" /dstatus
cscript "C:\Program Files\Microsoft Office\Office16\OSPP.VBS" /dstatus
cscript "C:\Program Files (x86)\Microsoft Office\Office15\OSPP.VBS" /dstatus
cscript "C:\Program Files\Microsoft Office\Office15\OSPP.VBS" /dstatus
cscript "C:\Program Files (x86)\Microsoft Office\Office15\OSPP.VBS" /inpkey:yourkeygoeshere
cscript "C:\Program Files\Microsoft Office\Office15\OSPP.VBS" /inpkey:yourkeygoeshere


launchctl unload /Library/LaunchAgents/screenconnect-xxxxxxxxxxxxxxxx-onlogin.plist
rm /Library/LaunchAgents/screenconnect-xxxxxxxxxxxxxxxx-*.plist
rm -r /opt/screenconnect-xxxxxxxxxxxxxxxx.app
sudo rm /Library/LaunchAgents/screenconnect-xxxxxxxxxxxxxxxx-*.plist
<<<then enter admin password>>>


tunefs: POSIX.1e ACLs: (-a)                                disabled
tunefs: NFSv4 ACLs: (-N)                                   disabled
tunefs: MAC multilabel: (-l)                               disabled
tunefs: soft updates: (-n)                                 enabled
tunefs: soft update journaling: (-j)                       enabled
tunefs: gjournal: (-J)                                     disabled
tunefs: trim: (-t)                                         disabled
tunefs: maximum blocks per file in a cylinder group: (-e)  4096
tunefs: average file size: (-f)                            16384
tunefs: average number of files in a directory: (-s)       64
tunefs: minimum percentage of free space: (-m)             8%
tunefs: space to hold for metadata blocks: (-k)            6408
tunefs: optimization preference: (-o)                      time
tunefs: volume label: (-L)
          __ ____
   _ __  / _/ ___|  ___ _ __  ___  ___
  | '_ \| |_\___ \ / _ \ '_ \/ __|/ _ \
  | |_) |  _|___) |  __/ | | \__ \  __/
  | .__/|_| |____/ \___|_| |_|___/\___|
  |_|


 +------------Welcome to pfSense-----------+
 |                                         |                 ______
 |  1. Boot Multi User [Enter]             |                /      \
 |  2. Boot [S]ingle User                  |          _____/    f   \
 |  3. [Esc]ape to loader prompt           |         /     \        /
 |  4. Reboot                              |        /   p   \______/  Sense
 |                                         |        \       /      \
 |  Options:                               |         \_____/        \
 |  5. [K]ernel: kernel (1 of 2)           |               \        /
 |  6. Configure Boot [O]ptions...         |                \______/
 |                                         |
 |                                         |
 |                                         |
 +-----------------------------------------+
cd /
cat /etc/fstab
# Device  Mountpoint FStype Options  Dump Pass#
/dev/ufsid/58b03b253575d41a  /  ufs rw  1 1
/dev/label/swap0  none  swap sw  0 0
# /sbin/tunefs -t enable /dev/ufsid/58b03b253575d41a
tunefs: issue TRIM to the disk set
# /sbin/reboot


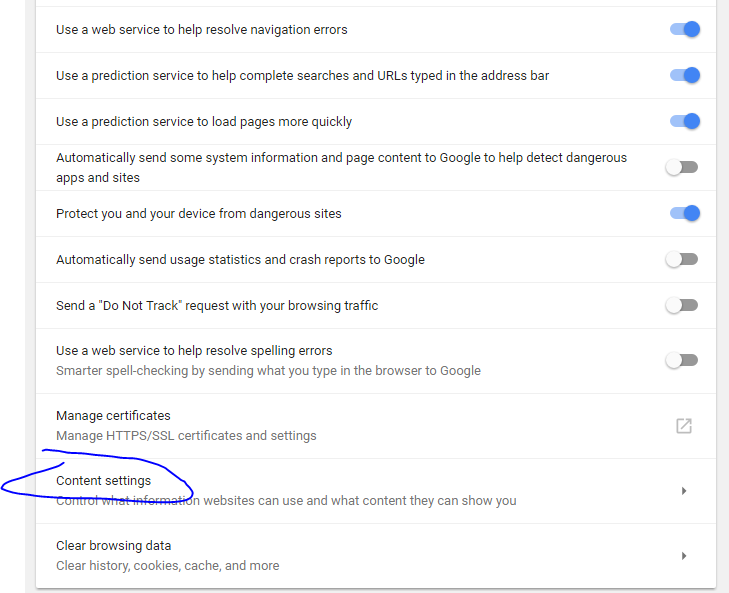